
In some scenarios, you may want to enable Application Styling at run time instead of design time. You can accomplish this by using the AppStylingManager component (located in Infragistics.WebUI.Shared assembly). However, you will need to create the necessary directories/sub-directories in your project and copy all the necessary files (CSS and images) for Application Styling to be applied properly.
To enable Application Styling using the AppStyleMananger component:
In the Solution Explorer, right-click the Web site you want to enable for Application Styling and select New Folder. Name the folder "ig_res".
Create a sub-folder for the ig_res folder by right-clicking the ig_res folder, selecting New Folder and naming it "Office2007Black".
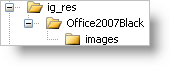
Create a sub-folder for the Office2007Black folder by right-clicking the Office2007Black folder, selecting New Folder and naming it "images" as shown in the following screen shot.
Right-click the ig_res folder and select Add Existing Item…. Navigate to the following folder where the StyleSets are installed by default: C:\Documents and Settings\All Users\Documents\Infragistics\2023.1ASP.NET\StyleLibraries. Copy all the CSS files and images, and paste them into the corresponding folders created in the preceding steps.
Open your Web site’s Web.config file. Near the top of the file, find the opening <configuration> tag and place the following XML excerpt underneath it. This XML excerpt enables Application Styling for the Web site.
In XML:
<configSections>
        <section name="infragistics.web"
          type="System.Configuration.SingleTagSectionHandler,System,
          Version=1.0.3300.0, Culture=neutral, PublicKeyToken=b77a5c561934e089" />
</configSections>
In the ASPX code-behind, place the following example code in the Page_Load event. This code enables Application Styling for the page and sets the StyleSet to Office2007Black.
In Visual Basic:
Private Sub Page_Load(ByVal sender As System.Object, _ ByVal e As System.EventArgs) Handles MyBase.Load
'Application Styling for ASP.NET Controls
Infragistics.WebUI.Shared.AppStyling.AppStylingManager.Settings.EnableAppStyling = true
Infragistics.WebUI.Shared.AppStyling.AppStylingManager.Settings.StyleSetName = "Office2007Black"
'Application Styling for Ultimate UI for ASP.NET AJAX Controls
Infragistics.Web.UI.AppStylingManagerDesign.Settings.EnableAppStyling = true
Infragistics.Web.UI.AppStylingManagerDesign.Settings.StyleSetName = "Office2007Black"
End Sub
In C#:
private void Page_Load(object sender, System.EventArgs e)
{
//Application Styling for ASP.NET Controls
Infragistics.WebUI.Shared.AppStyling.AppStylingManager.Settings.EnableAppStyling = true;
Infragistics.WebUI.Shared.AppStyling.AppStylingManager.Settings.StyleSetName = "Office2007Black";
//Application Styling for Ultimate UI for ASP.NET AJAX Controls
Infragistics.Web.UI.AppStylingManagerDesign.Settings.EnableAppStyling = true;
Infragistics.Web.UI.AppStylingManagerDesign.Settings.StyleSetName = "Office2007Black";
 }
Run your application. You will now see the Office2007Black style applied to all the Ultimate UI for ASP.NET controls in your project.