

This topic continues from Setting Up a Project for XSD Support (Part 1 of 4).
In this section of the tutorial we will create the XSD schema which provides the data source’s structure and the data constraints used by the WinGrid™. The schema describes a simple customer-to-orders data model. This data model will be represented in the WinGrid by two related bands. The root band will be the Customers table and it will have the Orders table as a child band. The relationship between the two bands will be based on the CustID field, which is the primary key of the Customers band and serves as the foreign key of the Orders band.
First you need to add an XSD file to the project. You can do this by right clicking on the node in Solution Explorer which represents your project and selecting Add, then selecting Add New Item on the submenu. In the dialog under Templates select XML Schema and name the file "cust-orders.xsd." When you are ready to proceed click the Add button.
Opening the XSD file should present you with the design surface used for creating XSD schemas in Visual Studio. If you are not presented with a graphical design surface, but the XML text editor instead, click the "Design" tab button in the bottom left corner of the window. If you open the Toolbox at this point you will notice that the available toolbox items are XML schema objects.
Drag an element object from the Toolbox onto the design surface. You will see that the the design surface now contains the visual representation of an XSD element. This object has three columns: a drop-down list column indicating the category of an entity, the name of an entity, and the type of an entity. Each row in this little grid represents an XSD entity contained in the element.
The element that was just created will represent the Customers data structure of the schema. In the second column of the first row type "Customers". This specifies the name of the element. In the first column of the second row select group from the drop-down, and in the second column type "ref=NameInfo". Now the Customers element references a group called "NameInfo", which will be created later. In the first column of the third row select attribute from the drop-down, and in the second column type "ref=CustID". This causes the Customers element to reference a globally defined attribute. When we create the Orders element later on we will make it reference this attribute as well, which is why it is being defined globally.
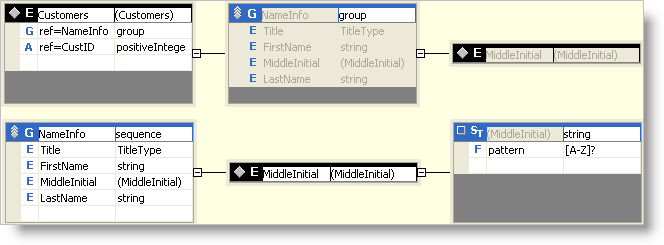
Your schema should look like the screen shot below:
Now we will create the NameInfo group referenced by the Customers element. First drag a group object from the Toolbox onto the design surface and name it "NameInfo". In the first column of the next row select element from the drop-down. In the second column of the same row type "Title", and in the third column type "TitleType". Now the NameInfo group contains an element called "Title" of type "TitleType". The TitleType data type will be created later.
Add another element of type string to the group and call it "FirstName". Make a third element called "MiddleInitial" whose data type is Unnamed simpleType. This will generate a structure under the the NameInfo group object which will be configured shortly. Now create the final element in the NameInfo group called "LastName" of type string.
Notice how the NameInfo group has structures which represent the MiddleInitial element and its data type. In the simpleType box (labeled "ST"), locate the cell in the first column of the second row and select facet from the drop-down. A facet is a construct in XSD used for creating restrictions on the data. In the second column of that row select pattern, and in the third column type the regular expression "[A-Z]?". This constraint indicates to the WinGrid that values in the MiddleInitial column can either be empty or a single uppercase letter. The regular expression we specified will automatically be assigned to the RegexPattern property of the MiddleInitial column when the WinGrid reads in the schema at run-time.
Your design area should now look like the screen shot below:
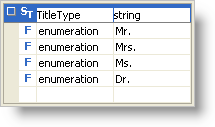
Next drag a simpleType object from the Toolbox onto the design surface. In the second column of the first row type "TitleType" and leave the last column as type string. In the first column of the next row select facet from the drop-down, and in the second column select enumeration. Repeat the previous step three more times. After you have created four identical rows, in the last column of each row type "Mr.", "Mrs.", "Ms.", and "Dr." (one value per row). When the WinGrid applies the schema-supplied constraints for the "Title" column it will create a ValueList in the "Title" column which contains the four values we just specified. The end-user will only be able to select one of those values for cells in that column.
This simpleType object should look similar to the screen shot below:
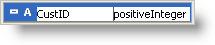
Now it is time to create the global "CustID" attribute. Drag an attribute object onto the design surface from the Toolbox and name it "CustID". In the last column select the data type positiveInteger. The fact that this attribute is of type positiveInteger will make the WinGrid require that values entered into the CustID column are integers with a value greater than 0.
This object should look similar to the screen shot below:
To define the Orders data structure you need to drag a new element object onto the design surface and name it "Orders". Add a row whose category is element and is named "OrderID". The data type of this element is "OrderIDType".
The next element is named "ProductName" and is of type Unnamed simpleType.
In the next row create an element named "Price" which is also of type Unnamed simpleType.
The fourth element is called "Quantity" and is of type Unnamed simpleType.
The second to last row is an attribute labeled "ref=CustID" of type positiveInteger.
The last row is an attribute named "Category" of type string.
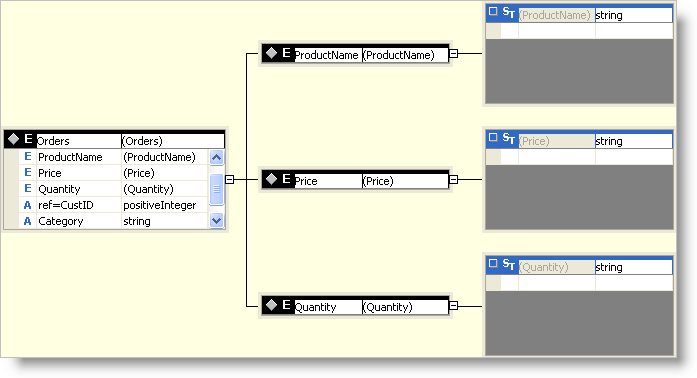
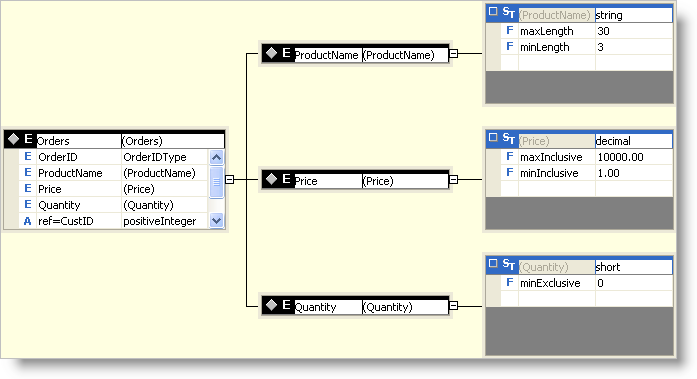
At this point your Orders structure should look similar to the screen shot below:
At this point it is necessary that we add restrictions to the simpleTypes used by entities in the Orders data structure. First locate the simpleType box which represents the ProductName type. In the first column of the second row select facet from the drop-down, in the second column select maxLength, and in the final column enter the value 30. In the next row select facet for the first column. In the second column select minLength and in the last column type in 3. These two facets will be instruct the WinGrid that values in the ProductName column must be between 3 and 30 characters long. The minLength facet corresponds to the MinLength property on the UltraGridColumn and maxLength corresponds to the MaxLength property.
In the Price simpleType box, change the data type located in the third column of the first row to decimal. In the second row the first column should be set to facet, the second column maxInclusive, and the final column should be set to 10000.00. In the third row select facet for the first column, minInclusive for the second column, and in the final column enter 1.00. When the WinGrid is validating data entered into the Price column it will require that the value entered is a number between 1.00 and 10000.00. The minInclusive facet corresponds to the MinValue property on the UltraGridColumn and maxInclusive corresponds to the MaxValue property.
The final simpleType named Quantity should be of type short. In the second row select facet, for the second column select minExclusive and in the final column enter the value 0. The Quantity column in the WinGrid will be restricted to having short values that are greater than 0. The minExclusive facet corresponds to the MinValueExclusive property on the UltraGridColumn.
Your Orders structure should now look similar to this:
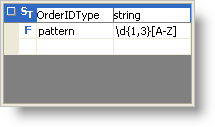
As the final item for the Orders data structure, drag a simpleType object from the Toolbox onto the design surface. Name it "OrderIDType" and set its data type to string. In the second row select facet for the first column, pattern for the second column, and type in the regular expression "\d{1,3}[A-Z]" for the third column. This regular expression indicates to the WinGrid that columns whose XSD data type is OrderIDType must have values which start with one to three numeric values followed by a single uppercase letter.
This simpleType object should like similar to the screen shot below:
This concludes the definition of our schema’s fundamental data structures. In the next section we will create a relationship between the Customers and Orders elements/tables, as well as use our schema to create the structure of a DataSet. After the DataSet has been created we will populate it with some test data.