
Row layouts give you a great deal of flexibility in designing the look of the WinGrid™ in your application. You can use row layouts to create a form-like look for data display and entry in both the conventional row view style and the Card View style of the grid.
Add an UltraWinGrid to your form and bind it to a data source. (If you need assistance with this process, see Bind WinGrid to a Flat Data Source or Bind WinGrid to a Hierarchical Data Source .)
Right-click on the grid and choose "UltraGrid Designer…" from the context menu, or select the grid and click the "UltraGrid Designer…" link in the bottom pane of the property sheet. The UltraGrid Designer dialog will appear. Expand the "Band and Column Settings" item of the tree in the left hand side of the dialog. You will notice the root band as one of the sub-items. Expand this item and depending on your preference settings you will see any of the child bands listed as the sibling of the root band or as the child items of the root band, if you have a hierarchical dataset.
Expand the band you want to create the row-layout for. Select the "Column Arrangement Overview" subitem. In the panel right of the tree, you will notice two radio options: "Use Row Layout" and "Use Groups And Levels". Select "Use Row Layout" and click the "Design Column Arrangement Now" button that’s on the right of the radio group.
You will see the row-layout designer appear in a separate form. For more information about the Row Layout Designer see the Row Layouts topic.
The right hand pane shows a representation of the data fields and headers of the band you are working with. This area is interactive: you use the mouse to reposition elements in the pane in order to create the layout.
Click inside one of the fields on the row and drag it it over the other fields. As it moves, you will see the display change to indicate how the field may be placed. Red arrows appear to indicate how the field will be positioned when dropped. Drop the field into the desired location. You will see the fields and headers re-arrange themselves accordingly.
Click the edge of one of the fields and drag. You will see that you can resize any object in the layout in either the horizontal or vertical direction. resize any cells to the desired width and/or height.
While you are working with fields, you may notice two things. One is that blank areas open up in the layout. You can drag fields into these blank areas, and the drop target will be indicated with a red outline instead of the red arrows.
To resize a cell so that it spans across two or more cells either horizontally or vertically, you must alter the Span settings for the cell. There are two ways to accomplish this:
Hold down the CTRL key on the keyboard, click on one of the edges of the cell, and drag as you did for resizing. With the CTRL key held down, you can dynamically alter the Span settings of a cell using the visual interface. This approach displays the relevant SpanX and SpanY settings in a tooltip for your reference.
Click on a cell in the Layout area to select the cell and its header, then click the Column Settings tab on the left. Scroll down in the property grid until you locate the SpanX and SpanY properties. You can enter new values for the properties directly in the grid.
You may find the SpanX and SpanY properties counter-intuitive at first. For example, the default setting for these properties is 2, but that setting seemingly does not cause the cell to actually span any columns or rows. These settings make sense only in the context of the underlying virtual grid on which row layouts are based. For a better understanding of how to set these properties.
Data labels default to appearing above the cells in a regular layout and to the left of the cells in a Card View layout. There are several changes you can make that will affect how the labels and cells are arranged.
Click the Column Settings tab in the left part of the dialog and locate the LabelPosition property in the property grid. This property only applies under certain conditions. In regular row view, LabelPosition is only used when the "Keep headers with cells" View option has been selected on the Band Info tab. In card view, LabelPosition applies when either the "MergedLabels" or "Compressed" View option is selected. In all other circumstances, the setting of the property is ignored except when it’s set to None or LabelsOnly. Selecting None will hide the column header and selecting LabelsOnly will hide the cells of the column.
Click the drop-down for the property and select one of the available options to change the setting for the currently selected cell/label pair. You can position labels on any edge of the cell.
To keep labels directly connected to their data, take one of the following actions, depending on the view style you are using:
If you are using Regular View, click the Layout Design tab on the left and expand the Standard/Card View then expand the Standard View and check the box labelled "Keep headers with cells".
If you are using Card View, click the Layout Design tab on the left and expand the Standard/Card View then expand the Card View and select either the StandardLabels, Merged Labels, or Compressed option form the drop-down. Either of these view settings will keep labels in proximity to the data.
Row layouts are stored as part of the Grid’s DisplayLayout. You can use the Load/Save tab of the dialog to save multiple row layouts to the DisplayLayout of the element.
To save the row layout to a file on disk, you must save the Layout of the entire grid. Clicking the Load/Save tab in the Row Layout Designer, and select the Save Layout As… button. This will cause a dialog to appear asking for a Layout Key to be entered. Once you have entered the key click the OK button and the drop down on the Load/Save tab now shows the Layout as an option to be selected.
In the Load/Save tab click the Reset Layout button to reset the Row Layout. A message box will appear asking you to confirm the reset. Clicking Yes will restore the default row layout.
The following snapshots show some of the possible ways of presenting data using the Row Layouts functionality.
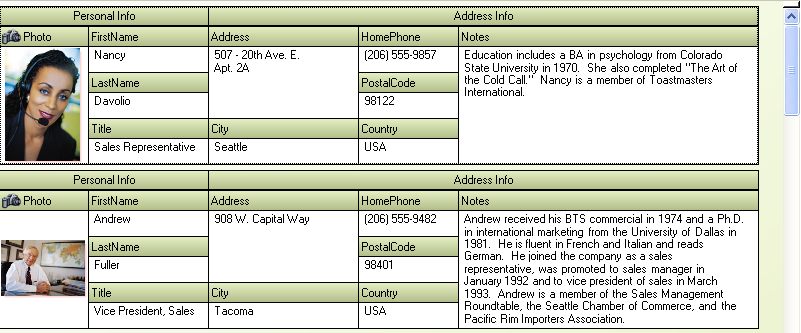
Row layout in conventional view with "Keep headers with cells" option.
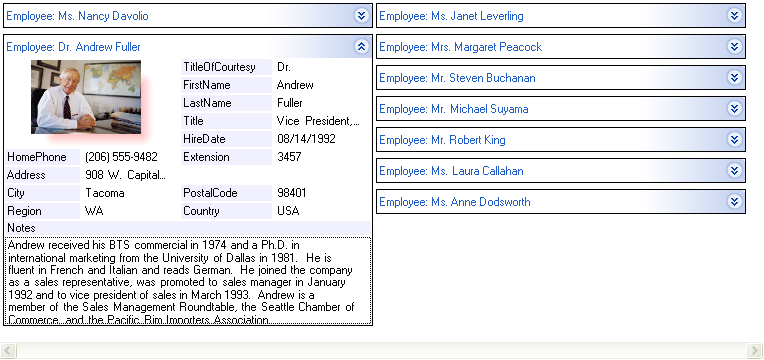
Row layout in card view with StandardLabels card style.
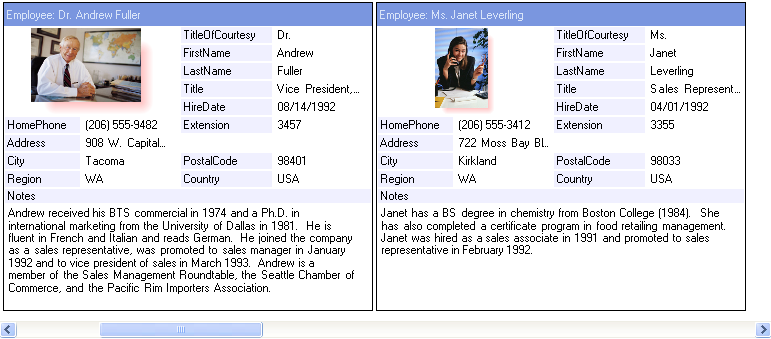
Row layout in card view with Compressed card style.