Version

Using WinPrintPreviewDialog with WinSchedulePrintDocument

In 2005 Volume 1, a new control was added that allows the ability to Print Preview a PrintDocument. This WinPrintPreviewDialog™ uses two other controls that were also added in 2005 Volume 1, which are the WinPrintPreviewControl and WinPrintPreviewThumbnail™. The WinPrintPreviewDialog works with any .NET PrintDocument, this includes the WinSchedulePrintDocument™ that is used to print any of the schedule views. This topic focuses on using the WinSchedulePrintDocument with the WinPrintPreviewDialog.

  1. Create a new Windows Application. With the form open in design view, add an UltraDayView control and two Button controls to the form. Then add an UltraSchedulePrintDocument, UltraPrintPreviewDialog, and UltraCalendarInfo.

  2. Select the Button Controls and change the text property so that one says "Print Preview" and the other says "Close".

  3. Now go into the Form’s code file, and create handlers for the Click events of the buttons, as well as for the Form Load event.

  4. In the Form Load event handler place the following code. The comments explain what each line is doing.

In Visual Basic:

Private Sub Using_WinPrintPreviewDialog_with_WinSchedulePrintDocument_Load( _
  ByVal sender _
  As System.Object, ByVal e As System.EventArgs) _
  Handles MyBase.Load
	' Create an appointment
	Me.CreateAppointment()
	' Set the UltraDayView's CalendarInfo to
	' the UltraCalendarInfo control.
	' This are what give the UltraDayView its appointments.
	Me.UltraDayView1.CalendarInfo = Me.UltraCalendarInfo1
	' Set the UltraSchedulePrintDocument's CalendarInfo and
	' to UltraCalendarInfo control.
	' This allows the document to use the same appointments that
	' your UltraDayView use.
	Me.UltraSchedulePrintDocument1.CalendarInfo = Me.UltraCalendarInfo1
	' Set the UltraPrintPreviewDialog's Document property to
	' the UltraSchedulePrintDocument
	Me.UltraPrintPreviewDialog1.Document = Me.UltraSchedulePrintDocument1
End Sub

In C#:

private void Using_WinPrintPreviewDialog_with_WinSchedulePrintDocument_Load(
  object sender,
  EventArgs e)
{
	// Create an appointment
	this.CreateAppointment();
	// Set the UltraDayView's CalendarInfo to
	// the UltraCalendarInfo control.
	// This are what give the UltraDayView its appointments.
	this.ultraDayView1.CalendarInfo = this.ultraCalendarInfo1;
	// Set the UltraSchedulePrintDocument's CalendarInfo and
	// to UltraCalendarInfo control.
	// This allows the document to use the same appointments that
	// your UltraDayView use.
	this.ultraSchedulePrintDocument1.CalendarInfo = this.ultraCalendarInfo1;
	// Set the UltraPrintPreviewDialog's Document property to
	// the UltraSchedulePrintDocument
	this.ultraPrintPreviewDialog1.Document = this.ultraSchedulePrintDocument1;
}
  1. For demonstration purposes we will show one appointment on the UltraDayView. The code below creates this appointment in a CreateAppointment method.

In Visual Basic:

Private Sub CreateAppointment()
	' Make up an appointment to show on the calendar
	Dim myStartDate As New DateTime(2007, 3, 23, 1, 23, 3)
	Dim myEndDate As New DateTime(2007, 3, 23, 1, 23, 3)
	Me.UltraCalendarInfo1.Appointments.Add(myStartDate, myEndDate, "Meeting")
End Sub

In C#:

private void CreateAppointment()
{
	// Make up an appointment to show on the calendar
	DateTime myStartTime = new DateTime(2007, 3, 23, 1, 23, 3);
	DateTime myEndTime = new DateTime(2007, 3, 23, 1, 23, 3);
	this.ultraCalendarInfo1.Appointments.Add(myStartTime, myEndTime, "Meeting");
}
  1. Finally we need to add code to the Click event for the buttons. First in the Click event labeled Print Preview, place the following code.

In Visual Basic:

Private Sub btnPrintPreview_Click(ByVal sender As System.Object, _
  ByVal e As System.EventArgs) Handles btnPrintPreview.Click
	' Call the ShowDialog to display the UltraPrintPreviewDialog
	Me.UltraPrintPreviewDialog1.ShowDialog(Me)
End Sub

In C#:

private void btnPrintPreview_Click(object sender, EventArgs e)
{
	// Call the ShowDialog to display the UltraPrintPreviewDialog
	this.ultraPrintPreviewDialog1.ShowDialog(this);
}

In the Click event for the button labeled Close place the following code.

In Visual Basic:

Private Sub btnClose_Click(ByVal sender As System.Object, _
  ByVal e As System.EventArgs) Handles btnClose.Click
	Me.Close()
End Sub

In C#:

private void btnClose_Click(object sender, EventArgs e)
{
	this.Close();
}
  1. If you were to now build and run the project you should get a form similar to the screen shot below.

application that is build using code and steps above.
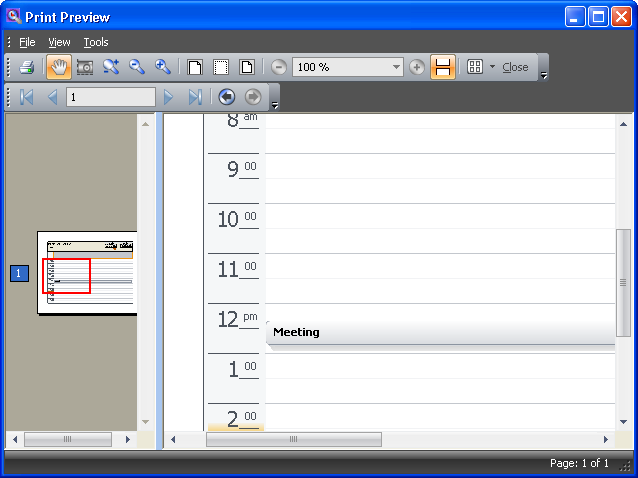
  1. If you click on the Print Preview button the WinPrintPreviewDialog will appear, showing the WinDayView with the appointment on it. To print the document, click the print option from the print preview dialog window.

winprintpreviewdialog showing the windayview.