ultraRadialMenu1.Show(this, new Point(Bounds.Right, Bounds.Top));
This topic provides an overview of adding the UltraRadialMenu™ tools using the code-behind.
The following topic is a prerequisite to understanding this topic:
This topic contains the following sections:
In this topic, you will learn how to add the WinRadialMenu tools using the code-behind.
Drop the UltraRadialMenu component from the toolbox area onto a form.
This can be either in the form’s load event or after the Initialization.
In C#:
ultraRadialMenu1.Show(this, new Point(Bounds.Right, Bounds.Top));In Visual Basic:
ultraRadialMenu1.Show(Me, New Point(Bounds.Right, Bounds.Top))At this point if you run the application, you will see the radial menu in its collapsed state.

The RadialMenuTool is the base class for all tool types. The button tool is of type RadialMenuTool representing tools such as Copy, Paste, Undo, Redo, Bold, Italic, among others. By default, the radial menu only contains the center tool without any child tools in its collection. First, you need to add tools to the center tool’s collection and then for each tool add child tools.
The following code demonstrates how to add a RadialMenuTool parent Copy tool type to the center tool’s collection.
In C#:
var mainCopyTool = new RadialMenuTool("mainCopyTool")
{
    Text = "Copy",
    ChildToolCheckBehavior = ChildToolCheckBehavior.Any,
    VisiblePosition = 5
};
mainCopyTool.ToolSettings.Appearance.Image = // Your image path
ultraRadialMenu1.CenterTool.Tools.Add(mainCopyTool);
In Visual Basic:
Dim mainCopyTool = New RadialMenuTool("mainCopyTool") With { _
      .Text = "Copy", _
      .ChildToolCheckBehavior = ChildToolCheckBehavior.Any, _
      .VisiblePosition = 5 _
}
mainCopyTool.ToolSettings.Appearance.Image = ' Your image path
ultraRadialMenu1.CenterTool.Tools.Add(mainCopyTool)
The following code demonstrates how to add a child Cut, Copy and Paste tools of the type RadialMenuTool to the parent Copy tool’s collection.
In C#:
// Add child Cut tool.
var cutTool = new RadialMenuTool("cutTool")
{
    Text = "Cut",
    VisiblePosition = 7
};
cutTool.ToolSettings.Appearance.Image = // Your image path
mainCopyTool.Tools.Add(cutTool);
// Add child Copy tool.
var copyTool = new RadialMenuTool("copyTool")
{
    Text = "Copy",
    VisiblePosition = 0
};
copyTool.ToolSettings.Appearance.Image = // Your image path
mainCopyTool.Tools.Add(copyTool);
// Add child Paste tool
var pasteTool = new RadialMenuTool("pasteTool")
{
    Text = "Paste",
    VisiblePosition = 1
};
pasteTool.ToolSettings.Appearance.Image = // Your image path
mainCopyTool.Tools.Add(pasteTool);
In Visual Basic:
' Add child Cut tool.
Dim cutTool = New RadialMenuTool("cutTool") With { _
      .Text = "Cut", _
      .VisiblePosition = 7 _
}
cutTool.ToolSettings.Appearance.Image = ' Your image path
mainCopyTool.Tools.Add(cutTool)
' Add child Copy tool.
Dim copyTool = New RadialMenuTool("copyTool") With { _
      .Text = "Copy", _
      .VisiblePosition = 0 _
}
copyTool.ToolSettings.Appearance.Image = ' Your image path
mainCopyTool.Tools.Add(copyTool)
' Add child Paste tool
Dim pasteTool = New RadialMenuTool("pasteTool") With { _
      .Text = "Paste", _
      .Checkable = True, _
      .VisiblePosition = 1 _
}
pasteTool.ToolSettings.Appearance.Image = ' Your image path
mainCopyTool.Tools.Add(pasteTool)
Result of the parent (Copy) and child (Cut, Copy and Paste) tools.


The following code creates a color tool similar to the Microsoft’s OneNote MX 2013 color tool.
In C#:
ultraRadialMenu1.CenterTool.Tools.AddOneNoteMxColorTool("Color");In Visual Basic:
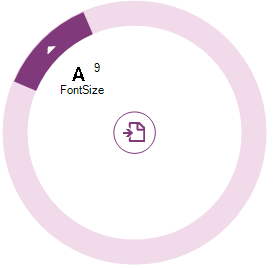
ultraRadialMenu1.CenterTool.Tools.AddOneNoteMxColorTool("Color")The following code creates a numeric tool using a numeric gauge tool representing the numeric value on a gauge.
In C#:
// Parent numeric tool for font sizes.
var fontSize = new RadialMenuNumericTool("FontSize")
{
Text = Properties.Resources.FontSize,
VisiblePosition = 7,
Value = 9
};
fontSize.ToolSettings.Appearance.Image = // Your image path
ultraRadialMenu1.CenterTool.Tools.Add(fontSize);
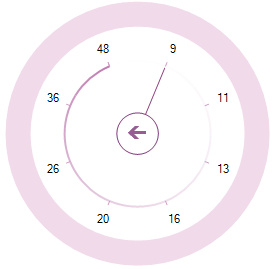
// Child gauge tool with FontSize options.
_rangeTool = new RadialMenuNumericGaugeTool();
NumericGaugeToolTickmark tickmark = _rangeTool.Tickmarks.Add(9);
tickmark.ShowLabel = false;
_rangeTool.Tickmarks.Add(9);
_rangeTool.Tickmarks.Add(11);
_rangeTool.Tickmarks.Add(13);
_rangeTool.Tickmarks.Add(16);
_rangeTool.Tickmarks.Add(20);
_rangeTool.Tickmarks.Add(26);
_rangeTool.Tickmarks.Add(36);
_rangeTool.Tickmarks.Add(48);
fontSize.Tools.Add(_rangeTool);In Visual Basic:
' Parent numeric tool for font sizes.
Dim fontSize = New RadialMenuNumericTool("FontSize") With { _
    .Text = "Font Size", _
    .VisiblePosition = 7, _
    .Value = 9 _
}
fontSize.ToolSettings.Appearance.Image = ' Your image path
UltraRadialMenu1.CenterTool.Tools.Add(fontSize)
' Child gauge tool with FontSize options.
Dim _rangeTool As RadialMenuNumericGaugeTool = New RadialMenuNumericGaugeTool()
Dim tickmark As NumericGaugeToolTickmark = _rangeTool.Tickmarks.Add(9)
tickmark.ShowLabel = False
_rangeTool.Tickmarks.Add(9)
_rangeTool.Tickmarks.Add(11)
_rangeTool.Tickmarks.Add(13)
_rangeTool.Tickmarks.Add(16)
_rangeTool.Tickmarks.Add(20)
_rangeTool.Tickmarks.Add(26)
_rangeTool.Tickmarks.Add(36)
_rangeTool.Tickmarks.Add(48)
fontSize.Tools.Add(_rangeTool)
Result of the numeric tool with numeric gauge tool.
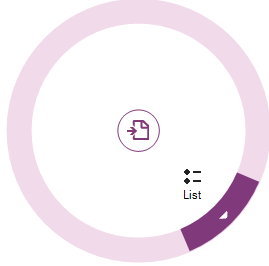
The following code creates a list tool containing a list of items in its collection.
In C#:
var listTool = new RadialMenuListTool("List")
    {
        Text = "List",
        VisiblePosition = 3
    };
listTool.ToolSettings.Appearance.Image = // Your image path
ultraRadialMenu1.CenterTool.Tools.Add(listTool);
listTool.ValueList.ValueListItems.Add("Item 1");
listTool.ValueList.ValueListItems.Add("Item 2");
listTool.ValueList.ValueListItems.Add("Item 3");
In Visual Basic:
Dim listTool = New RadialMenuListTool("List") With { _
.Text = "List", _
.VisiblePosition = 3 _
}
listTool.ToolSettings.Appearance.Image = ' Your image path
ultraRadialMenu1.CenterTool.Tools.Add(listTool)
listTool.ValueList.ValueListItems.Add("Item 1")
listTool.ValueList.ValueListItems.Add("Item 2")
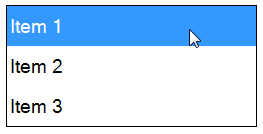
listTool.ValueList.ValueListItems.Add("Item 3")Result of the list tool and its list of items.
Clicking the List tool’s drill-down button displays the list of items in place of the radial menu, as shown below.
The following topics provide additional information related to this topic.