
When using a WinTabStrip™ control, all the controls are automatically shared among all the tabs. However, in the WinTab control, controls are typically placed in a control container that causes them to appear on only one tab.
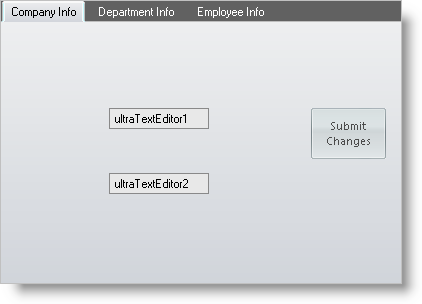
While most of the controls present on a tab page will vary from tab to tab, there are often certain controls you will want to appear on every tab. Such controls might be the OK and Cancel buttons for a dialog or simply a control indicating a setting that is relevant to all the tabs. For this reason the WinTab element provides a way to share one or more controls among tabs.
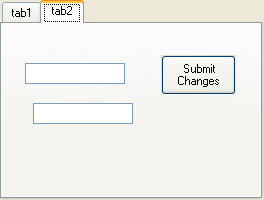
Another common situation is to have controls that you want to appear on multiple tabs, but not necessarily on every tab. For example, suppose you have tabs that provide options for the user to configure a grid interface for displaying in the application, or printing. You might provide a "Preview" button for the printed, but not the application-based settings. To handle situations such as this, the WinTab provides a way to exclude controls that are shared among all tabs from specific tabs.
Sharing controls and excluding shared controls are handled by two types of collections. At the element level, there is a SharedControls collection. Any controls that are added to this collection will be shared among all of the tabs in the element. At the Tab level, there is an ExcludedSharedControls collection. Any controls from the SharedControls collection that are added to this collection for a particular Tab will not appear on that tab.
When the Tab element is first added to the form and does not contain any tabs, the entire area of the element is taken up by the shared control container. Any controls placed on the element at this time will be shared among all tabs.
Add a new UltraWinTab element to your form.
Click in the area of the element under the tab header area. The Visual Studio property sheet will show you have selected the UltraTabSharedControlsPage.
Select a tool from the toolbox and:
Double-click it to add it to the shared controls page at the default size and position.
OR
Draw it in the shared controls page area using the size and position you wish.
The control you chose will appear on the shared controls page. Once a control has been added to the shared controls page, it will automatically appear on any tabs that are later added.
After tabs have been added to the element, you must manually display the shared controls page if you want to add new shared controls
Display the context menu for the element and choose "Show shared controls".
OR
Click the "Show shared controls" link in the bottom pane of the Visual Studio property sheet.
The shared controls page will be displayed in in the element along with any controls currently positioned on it.
Add, remove or reposition shared controls as needed.
Click one of the tabs in the tab header area to switch to that tab and hide the shared controls page again.
When you have added one or more tabs to the element, you can choose to exclude any controls on the shared controls page from appearing on that tab.
In the UltraWinTab element, select the tab from which you would like to exclude one or more shared controls.
Invoke the context menu for the element and choose "Exclude shared controls…" from the menu
OR
Click the "Exclude shared controls…" link in the bottom pane of the Visual Studio property sheet.
The Exclude Shared Controls dialog will appear.
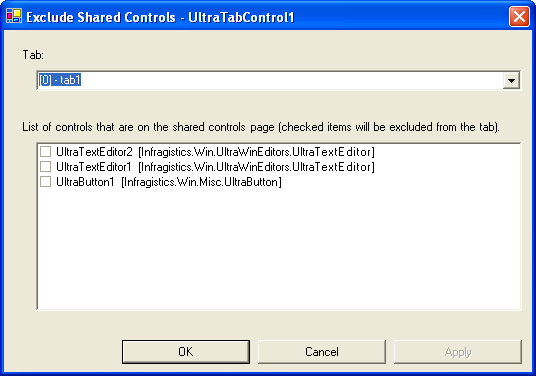
Verify that the Tab drop-down of the dialog is displaying the tab you selected. If you wish, you can use this drop-down to select another tab from which to exclude shared controls.
Beneath the drop-down is a list of all the controls on the shared controls page. Each control in the list has a checkbox. Click on the control(s) you want to exclude so that a check mark appears in the box.
If you want to exclude shared controls from other tabs, click the Apply button to apply your changes. You can then select a new tab from the drop-down. Otherwise, click OK to apply your changes and close the dialog.
You can use the following code to add a control (in this example, a button control) to the SharedControls collection of the control, which determines which controls will appear on the shared controls page:
In Visual Basic:
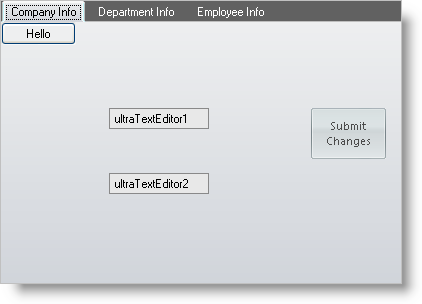
Private Sub Work_with_Shared_Controls_Load(ByVal sender As System.Object, _
  ByVal e As System.EventArgs) Handles MyBase.Load
	button1.Text = "Hello"
	Me.UltraTabControl1.SharedControls.Add(Me.button1)
End Sub
In C#:
private void Work_with_Shared_Controls_Load(object sender, EventArgs e)
{
	button1 = new Button();
	button1.Text = "Hello";
	this.ultraTabControl1.SharedControls.Add(this.button1);
}
You can use the following code to exclude a specific control (that is already a member of the SharedControls collection) from appearing on a specified tab. This code uses the Tab’s Index in the Tabs collection (0) to specify the Tab from which the controls are being excluded, but you can also use the Tab’s Key value if that has been specified:
In Visual Basic:
Private Sub btnExclude_Click(ByVal sender As System.Object, _
  ByVal e As System.EventArgs) Handles btnExclude.Click
	Me.UltraTabControl1.Tabs(0).ExcludedSharedControls.Add(Me.button1)
End Sub
In C#:
private void btnExclude_Click(object sender, EventArgs e)
{
	this.ultraTabControl1.Tabs[0].ExcludedSharedControls.Add(this.button1);
}