
{Warning}
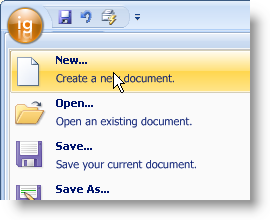
The Ribbon has a unique menu area that can be opened by clicking the large round button in the upper-left corner of the Ribbon. The drop-down Application Menu contains three areas where you can place almost any type of tool. These three areas are the ToolAreaLeft , ToolAreaRight , and FooterToolbar . The procedure for adding a tool to any one of these areas is very similar to adding a tool to a standard toolbar.
The following code demonstrates how to create a ButtonTool , add it to the Tools collection, and then add it to the left tool area.
In Visual Basic:
Imports Infragistics.Win.UltraWinToolbars
...
Dim NewMenuItem As New ButtonTool("NewMenuItem")
NewMenuItem.SharedProps.Caption = "New..."
Me.UltraToolbarsManager1.Tools.Add(newMenuItem)
Me.UltraToolbarsManager1.Ribbon.ApplicationMenu.ToolAreaLeft.Tools.AddTool( _
  "NewMenuItem")
In C#:
using Infragistics.Win.UltraWinToolbars;
...
ButtonTool newMenuItem = new ButtonTool("NewMenuItem");
newMenuItem.SharedProps.Caption = "New...";
this.ultraToolbarsManager1.Tools.Add(newMenuItem);
this.ultraToolbarsManager1.Ribbon.ApplicationMenu.ToolAreaLeft.Tools.AddTool(
  "NewMenuItem");