In addition to the column support added to the WinTree™ with Ultimate UI for Windows Forms 2005 Volume 2, the ability to bind the control was also added. You can either bind the root nodes collection, using the DataSource and DataMember properties, or you can use the SetDataBindingMethod of a nodes collection to bind the contents of a specific node’s Nodes collection. The WinTree may be bound to an IList or IBindingList datasource and depending upon the AutoGenerateColumnSets can automatically generate UltraTreeColumnSet and UltraTreeNodeColumn objects based on the datasource.
In this topic we will look at binding the WinTree to a DataSet or DataTable. In this example, the data source will be created using an untyped DataSet but you could also bind the WinTree to a typed DataSet (e.g. one created using Visual Studio’s Server Explorer).
Create a new Windows Application and open the form in design view. Add a WinTree to the Form from the toolbox, and set its Dock property to Fill.
You will notice that by adding the WinTree to your project three references were added:
Infragistics.Shared.v23.2
Infragistics.Win.UltraWinTree.v23.2
Infragistics.Win.v23.2
Add a DataSet to the form from the toolbox. In the "Add DataSet" dialog that is displayed, choose "Untyped dataset" and hit Ok. This will generate a DataSet instance named "dataSet1".
Right click on dataSet1 and choose "Properties". In the property grid, select the Tables property and click the ellipses button. In the Tables Collection Editor that is displayed, press Add and change the TableName property to "Customers".
Next we will define the columns in the Customers DataTable. Select on the Columns property and click on the ellipses button to display the Columns Collection Editor.
Click the Add button to create a new Column and change its ColumnName property to "Last Name". Then repeat this for "First Name", "Middle Name" and "Title" to generate the other 3 columns in the datatable. Then click Ok to close the columns editor and click Ok to close the datatable editor.
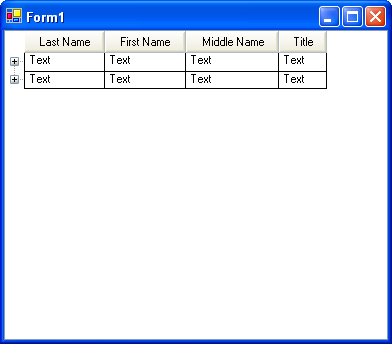
To set this DataSet schema as the data source for the WinTree, right click on the WinTree and choose "Properties". In the property grid, select the DataSource property and click the drop down arrow. Choose the DataSet (e.g. dataSet1) that you created. You may notice that the WinTree changes to show a single root node that represents the "Customers" band; this is referred to as a "band" node and is a special type of bound node and displays the name of the list in the underlying data source. You can click on the expansion indicator on this node to see the column structure that was created. Your tree should now look similar to the screenshot below.
If you now select the DataMember property in the properties grid, a drop down arrow appears and you can select the band you defined in the data source (e.g. "Customers"). If you do this you will notice that the band node is removed and the grid structure appears at the root level.