
This topic provides information on how to get started with the XamScheduler control in your applications.
The steps below will guide you on how to quickly setup a XamScheduler in your page showing one appointment.
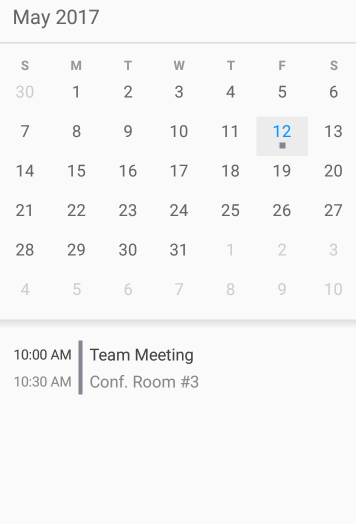
The following image is a preview of the result:
Create a Xamarin.Forms application project.
Create new Forms Content Page Xaml
In the page XAML add the following namespace:
In XAML:
xmlns:igScheduler="clr-namespace:Infragistics.XamarinForms.Controls.Scheduler;assembly=Infragistics.XF.Scheduler"Add the XamScheduler definition in the content grid:
In XAML:
<Grid>
    <igScheduler:XamScheduler x:Name="scheduler" />
</Grid>
Open the page’s code-behind and add the following namespace:
In C#:
using Infragistics.Scheduler;
using Infragistics.XamarinForms.Controls.Scheduler;
Create a private method for populating the XamScheduler's activities:
In C#:
private void PopulateActivities()
{
    DateTime today = DateTime.Now.Date;

    // Create an appointment
    Appointment appointment1 = new Appointment();
    appointment1.Subject = "Team Meeting";
    appointment1.Location = "Conf. Room #3";
    appointment1.Start = new DateTime(today.Year, today.Month, today.Day, 10, 0, 0);
    appointment1.End = new DateTime(today.Year, today.Month, today.Day, 10, 30, 0);


    // Create a list of appointment
    ObservableCollection<Appointment> appointments = new ObservableCollection<Appointment>();
    appointments.Add(appointment1);

    // Create a ScheduleListDataSource instance
    ScheduleListDataSource dataSource = new ScheduleListDataSource();
    dataSource.AppointmentItemsSource = appointments;

    // Set the data source to the control
    this.scheduler.DataSource = dataSource;
}
Invoke the method defined in the previous step just after the InitializeComponent() invocation in the page’s constructor.
In C#:
PopulateActivities();Build, deploy and run your application.