
This topic explains how to configure to the crosshairs in the XamScatterSurface3D™ control.
The following topics are prerequisites to understanding this topic:
This topic contains the following sections:
Crosshairs appears as a set of thin lines on mouse hover over the xamScatterSurface3D series surface. They intersect at the mouse pointer and help the user to locate precisely a data point of interest.
Use the XamScatterSurface3D CrosshairAxes property to configure for which axes the crosshairs are visible.
By default, the crosshairs are enabled for all axes and the initial value of the CrosshairAxes is AxisFlags3D.XYZ.
The following table maps the desired configuration to the property settings that manage it.
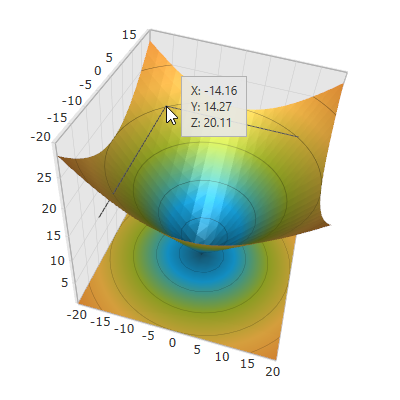
The screenshot below demonstrates how the xamScatterSurface3D control crosshairs behave as a result of the following settings:
Following is the code that implements this example.
In XAML:
<ig:XamScatterSurface3D Name="SurfaceChart"
 ItemsSource="{Binding Path=DataCollection}"
 XMemberPath="X" YMemberPath="Y" ZMemberPath="Z"
 CrosshairAxes="XY" />
In C#:
…
SurfaceChart.CrosshairAxes = AxisFlags3D.XY;
In Visual Basic:
…
SurfaceChart.CrosshairAxes = AxisFlags3D.XYUse the XamScatterSurface3D CrosshairBrush property to configure the crosshair brush.
The following table maps the desired configuration to the property settings that manage it.
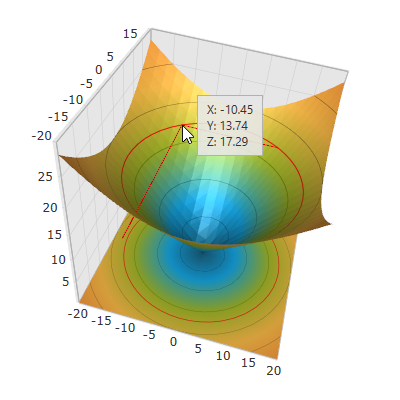
The screenshot below demonstrates how the xamScatterSurface3D crosshairs looks as a result of the following settings:
Following is the code that implements this example.
In XAML:
<ig:XamScatterSurface3D Name="SurfaceChart"
 ItemsSource="{Binding Path=DataCollection}"
 XMemberPath="X" YMemberPath="Y" ZMemberPath="Z"
 CrosshairBrush="Red"/>
In C#:
…
SurfaceChart.CrosshairBrush = new SolidColorBrush(Colors.Red);
In Visual Basic:
…
SurfaceChart.CrosshairBrush = New SolidColorBrush(Colors.Red)Use the XamScatterSurface3D CrosshairThickness property to configure the crosshair thickness.
The following table maps the desired configuration to the property settings that manage it.
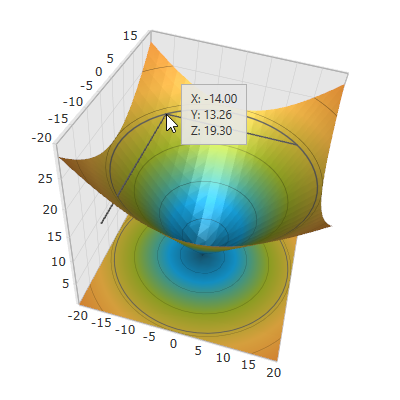
The screenshot below demonstrates how the xamScatterSurface3D crosshairs looks as a result of the following settings:
Following is the code that implements this example.
In XAML:
<ig:XamScatterSurface3D Name="SurfaceChart"
 ItemsSource="{Binding Path=DataCollection}"
 XMemberPath="X" YMemberPath="Y" ZMemberPath="Z"
 CrosshairThickness="3"/>
In C#:
…
SurfaceChart.CrosshairThickness = 3;
In Visual Basic:
…
SurfaceChart.CrosshairThickness = 3The following topics provide additional information related to this topic.