This topic describes how to create and apply a new custom theme to a control using Infragistics ThemeManager™.
The following topics are prerequisites to understanding this topic:
This topic contains the following sections:
The following procedure walks you through the creating and applying a custom theme to the TabItem control using ThemeManager.
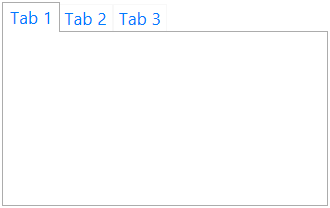
The following screenshot is a preview of the final result.

Following are the general requirements for creating and applying a custom theme to the TabItem control.
NuGet package references:
Infragistics.WPF
For more information on setting up the NuGet feed and adding NuGet packages, you can take a look at the following documentation: NuGet Feeds.
Namespaces:
A reference to the Infragistics® namespace: (xmlns:ig="http://schemas.infragistics.com/xaml")
To complete the procedure, you need the following:
A Microsoft® Visual Studio® WPF project with a page
The required NuGet package references and namespaces added to the project (See the Requirements section above.)
Include the custom theme Resource Dictionary CustomTabItemTheme.xaml to your project
Following is a conceptual overview of the process:
The following steps demonstrate how to create and apply a custom theme to a TabItem control.
Create a custom theme for TabItem in Resource Dictionary
Refer the CustomTabItemTheme.xaml for more information.
Create a custom theme class that derives from the ThemeBase class
Create a class named CustomTabItemTheme that derives from the ThemeBase class:
In C#:
public class CustomTabItemTheme : ThemeBase
{
    // Class implementation here
}
In Visual Basic:
Public Class CustomTabItemTheme Inherits ThemeBase
    ' Class implementation here
End Class
Implement the ThemeBase ConfigureControlMappings method in your custom theme class
Implement the ConfigureControlMappings method in your custom theme class to specify where the theme’s Resource Dictionary for that particular control identified by its fully qualified type name is located:
In C#:
protected override void ConfigureControlMappings()
{
   // Get the full name of the assembly where the theme's resource dictionaries are placed
   string assemblyFullName = typeof (CustomTabItemTheme).Assembly.FullName;
   Mappings.Add("System.Windows.Controls.TabItem",
       BuildLocationString(assemblyFullName, @"\CustomTabItemTheme.xaml"));
}
In Visual Basic:
Protected Overrides Sub ConfigureControlMappings()
    ' Get the full name of the assembly where the theme's resource dictionaries are placed
    Dim assemblyFullName As String = GetType(CustomTabItemTheme).Assembly.FullName
    Mappings.Add("System.Windows.Controls.TabItem", _
        BuildLocationString(assemblyFullName, "\CustomTabItemTheme.xaml"))
End Sub
Register your control to be used by ThemeManager
Register your control to ThemeManager after InitializeComponent method:
In C#:
ThemeManager.RegisterControl(typeof(TabItem));In Visual Basic:
ThemeManager.RegisterControl(GetType(TabItem))If you have created your custom control, you can register it to ThemeManager in the custom control static constructor in the following way:
In C#:
/// <summary>
/// Static constructor for <YourCustomControl> class.
/// </summary>
static <YourCustomControl>()
{
    Infragistics.Themes.ThemeManager.RegisterControl(typeof(<YourCustomControl>));
}
Apply your custom theme to the control
You can apply your custom theme using the following code:
In XAML:
<Grid>
    <ig:ThemeManager.Theme>
        <theming:CustomTabItemTheme />
    </ig:ThemeManager.Theme>
    <TabControl>
        <TabItem Header="Tab 1" />
        <TabItem Header="Tab 2" />
        <TabItem Header="Tab 3" />
    </TabControl>
</Grid>Following is the full code for this procedure.
Window XAML code
In XAML:
<Grid>
    <ig:ThemeManager.Theme>
        <theming:CustomTabItemTheme />
    </ig:ThemeManager.Theme>
    <TabControl>
        <TabItem Header="Tab 1" />
        <TabItem Header="Tab 2" />
        <TabItem Header="Tab 3" />
    </TabControl>
</Grid>
Window Code-behind
In C#:
public partial class MainWindow : Window
{
    public MainWindow()
    {
        InitializeComponent();
        ThemeManager.RegisterControl(typeof(TabItem));
    }
}
In Visual Basic:
Public Partial Class MainWindow Inherits Window
    Public Sub New()
        InitializeComponent()
        ThemeManager.RegisterControl(GetType(TabItem))
    End Sub
End Class
CustomTabItemTheme.cs
In C#:
public class CustomTabItemTheme : ThemeBase
{
    protected override void ConfigureControlMappings()
    {
        // Get the full name of the assembly where the theme's resource dictionaries are placed
        string assemblyFullName = typeof (CustomTabItemTheme).Assembly.FullName;
        Mappings.Add("System.Windows.Controls.TabItem",
            BuildLocationString(assemblyFullName, @"\CustomTabItemTheme.xaml"));
    }
}
In Visual Basic:
Public Class CustomTabItemTheme Inherits ThemeBase
    Protected Overrides Sub ConfigureControlMappings()
        ' Get the full name of the assembly where the theme's resource dictionaries are placed
        Dim assemblyFullName As String = GetType(CustomTabItemTheme).Assembly.FullName
        Mappings.Add("System.Windows.Controls.TabItem", _
            BuildLocationString(assemblyFullName, "\CustomTabItemTheme.xaml"))
    End Sub
End ClassThe following procedure walks you through the creating and applying a custom theme to the XamTileManager control using ThemeManager.
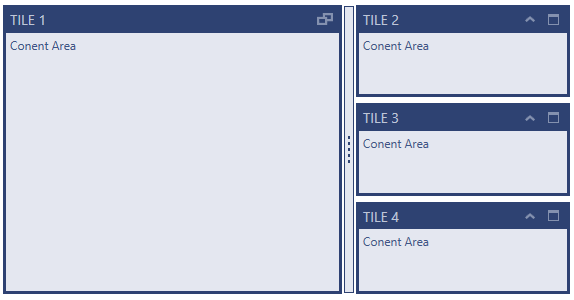
The following screenshot is a preview of the final result.

Following are the general requirements for creating and applying a custom theme to the xamTileManager control.
NuGet package reference:
Infragistics.WPF.TileManager
Namespaces:
A reference to the Infragistics® namespace: (xmlns:ig="http://schemas.infragistics.com/xaml")
To complete the procedure, you need the following:
A Microsoft® Visual Studio® WPF project with a page
The required assembly references and namespaces added to the project (See the Requirements section above.)
Include the following theme resources in your project:
Following is a conceptual overview of the process:
The following steps demonstrate how to create and apply a custom theme to the xamTileManager control.
Create a custom theme for xamTileManager in Resource Dictionary
Refer the CustomTheme.xamTileManager.xaml for more information.
Create a custom theme class that derives from the ThemeBase class
Create a class named CustomTheme that derives from the ThemeBase class:
In C#:
public class CustomTheme : ThemeBase
{
    // Class implementation here
}
In Visual Basic:
Public Class CustomTheme Inherits ThemeBase
    ' Class implementation here
End Class
Implement the ThemeBase ConfigureControlMappings method in your custom theme class
Implement the ConfigureControlMappings method in your custom theme class to specify where the theme’s Resource Dictionary for the xamTileManager control identified by its mapping key is located:
In C#:
protected override void ConfigureControlMappings()
{
    string assemblyFullName = typeof(CustomTheme).Assembly.FullName;
    Mappings.Add(ControlMappingKeys.XamTileManager,
        BuildLocationString(assemblyFullName, @"\CustomTheme.xamTileManager.xaml"));
}
In Visual Basic:
Protected Overrides Sub ConfigureControlMappings()
    Dim assemblyFullName As String = GetType(CustomTheme).Assembly.FullName
    Mappings.Add(ControlMappingKeys.XamTileManager, _
        BuildLocationString(assemblyFullName, "\CustomTheme.xamTileManager.xaml"))
End Sub
Apply your custom theme to the control
You can apply your custom theme using the following code:
In XAML:
<Grid>
    <ig:ThemeManager.Theme>
        <theming:CustomTheme />
    </ig:ThemeManager.Theme>
    <ig:XamTileManager>
        <ig:XamTile Header="TILE 1"
                    Content="Content Area"
                    IsMaximized="True" />
…
    </ig:XamTileManager>
</Grid>Following is the full code for this procedure.
XAML code
In XAML:
<Grid>
    <ig:ThemeManager.Theme>
        <theming:CustomTheme />
    </ig:ThemeManager.Theme>
    <ig:XamTileManager>
        <ig:XamTile Header="TILE 1"
                    Content="Content Area"
                    IsMaximized="True" />
        <ig:XamTile Header="TILE 2"
                    Content="Content Area" />
        <ig:XamTile Header="TILE 3"
                    Content="Content Area" />
        <ig:XamTile Header="TILE 4"
                    Content="Content Area" />
    </ig:XamTileManager>
</Grid>
CustomTheme.cs
In C#:
public class CustomTheme : ThemeBase
{
    protected override void ConfigureControlMappings()
    {
        // Get the full name of the assembly where the theme's resource dictionaries are placed
        string assemblyFullName = typeof(CustomTheme).Assembly.FullName;
        Mappings.Add(ControlMappingKeys.XamTileManager,
            BuildLocationString(assemblyFullName, @"\CustomTheme.xamTileManager.xaml"));
    }
}
In Visual Basic:
Public Class CustomTheme Inherits ThemeBase
    Protected Overrides Sub ConfigureControlMappings()
        ' Get the full name of the assembly where the theme's resource dictionaries are placed
        Dim assemblyFullName As String = GetType(CustomTheme).Assembly.FullName
        Mappings.Add(ControlMappingKeys.XamTileManager, _
            BuildLocationString(assemblyFullName, "\CustomTheme.xamTileManager.xaml"))
    End Sub
End ClassThe following topics provide additional information related to this topic.